Test your Drupal website with Cypress
cobadger
Wed, 04/26/2023 – 03:00
If you don’t include tests in your Drupal development, chances are it’s because you think it adds complexity and expense without benefit. Cypress is an open source tool with many benefits:
- Reliably tests anything that runs in a web browser
- Works on any web platform (it’s great for testing projects using front-end technologies like React)
- Highly extensible
- Increasingly popular
- Easy to learn and implement
- Protects against regression as your projects become more complex
- Can make your development process more efficient
This article covers three topics to help you start testing your Drupal project using Cypress:
Install Cypress
For the purposes of this tutorial I’m assuming that you have built a local dev environment for your Drupal project using the `drupal/recommended-project` project. Although details on creating such a project are outside of the scope of this piece, I recommend Getting Started with Lando and Drupal 9.
Your project has at least this basic structure:
vendor/
web/
.editorconfig
.gitattributes
composer.json
composer.lock
The cypress.io site has complete installation instructions for various environments. For this article, I installed Cypress using npm.
Initialize your project using the command npm init. Answer the questions that Node.js asks you, and then you will have a package.json file that looks something like this:
{
  "name": "cypress",
  "version": "1.0.0",
  "description": "Installs Cypress in a test project.",
  "main": "index.js",
  "scripts": {
    "test": "echo "Error: no test specified" && exit 1"
  },
  "author": "",
  "license": "ISC"
}
Install Cypress in your project:
$ npm install cypress --save-dev
Run Cypress for the first time:
$ npx cypress open
Because you haven’t added a config or any scaffolding files to Cypress, the Cypress app displays the welcome screen to help you configure the project. To configure your project for E2E (end-to-end) testing, click the Not Configured button for E2E Testing. Cypress adds some files to your project:
cypress/
node_modules/
vendor/
web/
.editorconfig
.gitattributes
composer.json
composer.lock
cypress.config.js
package-lock.json
package.json
Click Continue and choose your preferred browser for testing. Click Start E2E Testing in [your browser of choice]. I’m using a Chromium-based browser for this article.
In a separate window, a browser opens to the Create your first spec page:
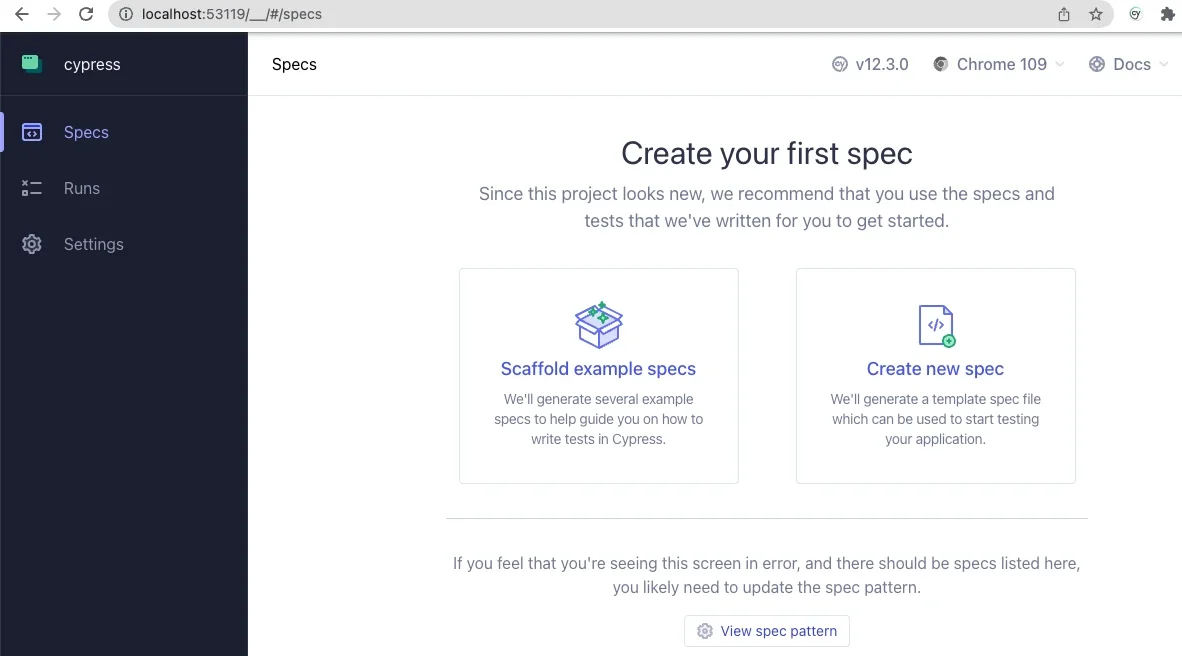
(Jordan Graham, CC BY-SA 4.0)
Click on the Scaffold example specs button to create a couple of new folders with example specs to help you understand how to use Cypress. Read through these in your code editor, and you’ll likely find the language (based on JavaScript) intuitive and easy to follow.
Click on any in the test browser. This reveals two panels. On the left, a text panel shows each step in the active spec. On the right, a simulated browser window shows the actual user experience as Cypress steps through the spec.
Open the cypress.config.js file in your project root and change it as follows:
const { defineConfig } = require("cypress");

module.exports = defineConfig({
  component: {
    fixturesFolder: "cypress/fixtures",
    integrationFolder: "cypress/integration",
    pluginsFile: "cypress/plugins/index.js",
    screenshotsFolder: "cypress/screenshots",
    supportFile: "cypress/support/e2e.js",
    videosFolder: "cypress/videos",
    viewportWidth: 1440,
    viewportHeight: 900,
  },

  e2e: {
    setupNodeEvents(on, config) {
      // implement node event listeners here
    },
    baseUrl: "https://[your-local-dev-url]",
    specPattern: "cypress/**/*.{js,jsx,ts,tsx}",
    supportFile: "cypress/support/e2e.js",
    fixturesFolder: "cypress/fixtures"
   },
 });
Change the baseUrl to your project’s URL in your local dev environment.
These changes tell Cypress where to find its resources and how to find all of the specs in your project.
Write and run basic tests using Cypress
Create a new directory called integration in your /cypress directory. Within the integration directory, create a file called test.cy.js:
cypress/
├─ e2e/
├─ fixtures/
├─ integration/
│  ├─ test.cy.js
├─ support/
node_modules/
vendor/
web/
.editorconfig
.gitattributes
composer.json
composer.lock
cypress.config.js
package-lock.json
package.json
Add the following contents to your test.cy.js file:
describe('Loads the front page', () => {
  it('Loads the front page', () => {
    cy.visit('/')
    cy.get('h1.page-title')
      .should('exist')
  });
});

describe('Tests logging in using an incorrect password', () => {
  it('Fails authentication using incorrect login credentials', () => {
    cy.visit('/user/login')
    cy.get('#edit-name')
      .type('Sir Lancelot of Camelot')
    cy.get('#edit-pass')
      .type('tacos')
    cy.get('input#edit-submit')
      .contains('Log in')
      .click()
    cy.contains('Unrecognized username or password.')
  });
});
When you click on test.cy.js in the Cypress application, watch each test description on the left as Cypress performs the steps in each describe() section.
This spec demonstrates how to tell Cypress to navigate your website, access HTML elements by ID, enter content into input elements, and submit the form. This process is how I discovered that I needed to add the assertion that the element contains the text Log in before the input was clickable. Apparently, the flex styling of the submit input impeded Cypress’ ability to “see” the input, so it couldn’t click on it. Testing really works!
Customize Cypress for Drupal
You can write your own custom Cypress commands, too. Remember the supportFile entry in the cypress.config.js file? It points to a file that Cypress added, which in turn imports the ./commands files. Incidentally, Cypress is so clever that when importing logic or data fixtures, you don’t need to specify the file extension, so you import ./commands, not ./commands.js. Cypress looks for any of a dozen or so popular file extensions and understands how to recognize and parse each of them.
Enter commands into commands.js to define them:
/**
 * Logs out the user.
 */

Cypress.Commands.add('drupalLogout', () => {
  cy.visit('/user/logout');
})

/**
 * Basic user login command. Requires valid username and password.
 *
 * @param {string} username
 *   The username with which to log in.
 * @param {string} password
 *   The password for the user's account.
 */

Cypress.Commands.add('loginAs', (username, password) => {
  cy.drupalLogout();
  cy.visit('/user/login');
  cy.get('#edit-name')
    .type(username);
  cy.get('#edit-pass').type(password, {
    log: false,
  });

  cy.get('#edit-submit').contains('Log in').click();
});
This example defines a custom Cypress command called drupalLogout(), which you can use in any subsequent logic, even other custom commands. To log a user out, call cy.drupalLogout(). This is the first event in the custom command loginAs to ensure that Cypress is logged out before attempting to log in as a specific user.
Using environment variables, you can even create a Cypress command called drush(), which you can use to execute Drush commands in your tests or custom commands. Look at how simple this makes it to define a custom Cypress command that logs a user in using their UID:
/**
* Logs a user in by their uid via drush uli.
*/

Cypress.Commands.add('loginUserByUid', (uid) => {
 cy.drush('user-login', [], { uid, uri: Cypress.env('baseUrl') })
   .its('stdout')
   .then(function (url) {
     cy.visit(url);
   });
});
This example uses the drush user-login command (drush uli for short) and takes the authenticated user to the site’s base URL.
Consider the security benefit of never reading or storing user passwords in your testing. Personally, I find it amazing that a front-end technology like Cypress can execute Drush commands, which I’ve always thought of as being very much on the back end.
Testing, testing
There’s a lot more to Cypress, like fixtures (files that hold test data) and various tricks for navigating the sometimes complex data structures that produce a website’s user interface. For a look into what’s possible, watch the Cypress Testing for Drupal Websites webinar, particularly the section on fixtures that begins at 18:33. That webinar goes into greater detail about some interesting use cases, including an Ajax-enabled form. Once you start using it, feel free to use or fork Aten’s public repository of Cypress Testing for Drupal.
Happy testing!
This article originally appeared on the Aten blog and is republished with permission.
Testing makes everything better. Learn how to use Cypress for your Drupal website.

Image by Mapbox Uncharted ERG, CC-BY 3.0 US
 This work is licensed under a Creative Commons Attribution-Share Alike 4.0 International License.
Powered by WPeMatico