Use Terraform to manage TrueNAS
Alan Formy-Duval
Mon, 06/13/2022 – 03:00
Sometimes combining different open source projects can have benefits. The synergy of using Terraform with TrueNAS is a perfect example.
TrueNAS is an OpenBSD-based operating system that provides network-attached storage (NAS) and network services. One of its main strengths is leveraging the ZFS file system, which is known for enterprise-level reliability and fault tolerance. Terraform is a provisioning and deployment tool embodying the concept of infrastructure as code.
TrueNAS
TrueNAS has a very nice web user interface (UI) for its management and an application programming interface (API). Terraform can be integrated with the API to provide configuration management of your NAS, as I’ll demonstrate below.
To begin, I used Virtual Machine Manager to configure a virtual machine and then installed the latest version, TrueNAS 13.0. The only necessary input was to enter the root password. Once it reboots, the main menu appears. You will also see the HTTP management address. You can access this address from your local web browser.
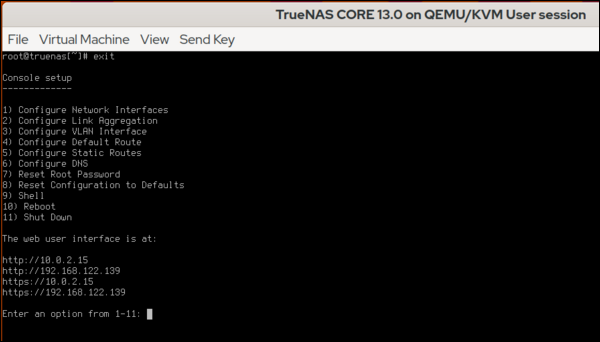
(Alan Formy-Duval, CC BY-SA 4.0)
Terraform
Terraform needs to be installed where it can access the TrueNAS management URL. I am taking advantage of tfenv, a tool for managing Terraform versions.
$ tfenv list-remote
$ tfenv install 1.2.0
$ tfenv use 1.2.0
$ terraform -version
Terraform v1.2.0
on linux_amd64
Next, create a working directory, such as ~/code/terraform/truenas, to contain the configuration files associated with your TrueNAS instance.
$ mkdir ~/code/terraform/truenas

$ cd ~/code/terraform/truenas
Create the initial terraform configuration file and add the necessary directives to define the TrueNAS provider.
$ vi main.tf
The provider will look like this, where the address and API key for your TrueNAS instance will need to be correctly specified.
$ cat main.tf


terraform {

  required_providers {

    truenas = {

      source = "dariusbakunas/truenas"

      version = "0.9.0"

    }

  }
}


provider "truenas" {

  api_key = "1-61pQpp3WyfYwg4dHToTHcOt7QQzVrMtZnkJAe9mmA0Z2w5MJsDB7Bng5ofZ3bbyn"

  base_url = "http://192.168.122.139/api/v2.0"
}
The TrueNAS API key is created in the Web UI. Log in and click the small gear in the upper right-hand corner.
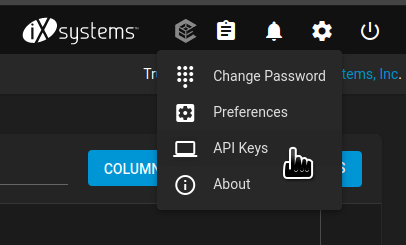
(Alan Formy-Duval, CC BY-SA 4.0)
This UI section enables you to create the API key. Once generated, copy it to the main.tf file.
Initialize
In your TrueNAS Terraform directory, you have the main.tf file. The first step is to initialize using the command terraform init, which should generate the following result:
Initializing the backend...


Initializing provider plugins...

- Finding dariusbakunas/truenas versions matching "0.9.0"...

- Installing dariusbakunas/truenas v0.9.0...

- Installed dariusbakunas/truenas v0.9.0 (self-signed, key ID E44AF1CA58555E96)


Partner and community providers are signed by their developers.

If you'd like to know more about provider signing, you can read about it here:

https://www.terraform.io/docs/cli/plugins/signing.html


Terraform has created a lock file .terraform.lock.hcl to record the provider

selections it made above. Include this file in your version control repository

so that Terraform can guarantee to make the same selections by default when

you run "terraform init" in the future.


Terraform has been successfully initialized!


You may now begin working with Terraform. Try running "terraform plan" to see

any changes that are required for your infrastructure. All Terraform commands

should now work.


If you ever set or change modules or backend configuration for Terraform,

rerun this command to reinitialize your working directory. If you forget, other commands will detect it and remind you to do so if necessary.
A successful initialization means you’re ready to start adding resources. Any TrueNAS item, such as a storage pool, network file system (NFS) share, or cron job, is a resource.
Add a ZFS dataset
The following example resource directive defines a ZFS dataset. For my example, I will add it to the main.tf file.
resource "truenas_dataset" "pictures" {

  pool = "storage-pool"

  name = "pictures"

  comments = "Terraform created dataset for Pictures"

 }
Run the command terraform validate to check the configuration.
Success! The configuration is valid.
Running terraform plan will describe the actions that Terraform will perform. Now, add the new dataset with terraform apply.
Terraform used the selected providers to generate the following execution plan. Resource actions are indicated with the following symbols:

  + create


Terraform will perform the following actions:


  # truenas_dataset.pictures will be created

  + resource "truenas_dataset" "pictures" {

      + acl_mode             = (known after apply)

      + acl_type             = (known after apply)

      + atime                = (known after apply)

      + case_sensitivity     = (known after apply)

      + comments             = "Terraform created dataset for Pictures"

      + compression          = (known after apply)

      + copies               = (known after apply)

      + dataset_id           = (known after apply)

      + deduplication        = (known after apply)

      + encrypted            = (known after apply)

      + encryption_algorithm = (known after apply)

      + encryption_key       = (sensitive value)

      + exec                 = (known after apply)

      + generate_key         = (known after apply)

      + id                   = (known after apply)

      + managed_by           = (known after apply)

      + mount_point          = (known after apply)

      + name                 = "pictures"

      + pbkdf2iters          = (known after apply)

      + pool                 = "storage-pool"

      + quota_bytes          = (known after apply)

      + quota_critical       = (known after apply)

      + quota_warning        = (known after apply)

      + readonly             = (known after apply)

      + record_size          = (known after apply)

      + ref_quota_bytes      = (known after apply)

      + ref_quota_critical   = (known after apply)

      + ref_quota_warning    = (known after apply)

      + share_type           = (known after apply)

      + snap_dir             = (known after apply)

      + sync                 = (known after apply)

    }


Plan: 1 to add, 0 to change, 0 to destroy.


Do you want to perform these actions?

  Terraform will perform the actions described above.

  Only 'yes' will be accepted to approve.


  Enter a value:
Type yes to confirm and hit Enter.
truenas_dataset.pictures: Creating...

truenas_dataset.pictures: Creation complete after 0s [id=storage-pool/pictures]


Apply complete! Resources: 1 added, 0 changed, 0 destroyed.
That’s it. You can check for this new dataset in the TrueNAS Web UI.

(Alan Formy-Duval, CC BY-SA 4.0)
Do more with TrueNAS and Terraform
The TrueNAS provider for Terraform allows you to manage many more aspects of your TrueNAS device. For instance, you could share this new dataset as an NFS or server message block (SMB) share. You can also create additional datasets, cron jobs, and zvols.
Get more out of TrueNAS when you integrate Terraform for configuration management.

Opensource.com
 This work is licensed under a Creative Commons Attribution-Share Alike 4.0 International License.
Powered by WPeMatico